Equipment
In the earlier stages of playing Battle Camp, I recommend not using equipment due to the high cost to repair it. If you are at a point where you have a decent amount of stones, why not give your team a little extra stat boost with equipment?
Forging
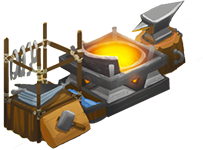
The forging station allows you to forge equipment to add a bonus to attack, health, and recovery on a monster. There are 2 items needed to forge level 1 equipment, crafting shards and plans. For level 2 equipment, upgrade shards, the level 1 version of the equipment, portable anvils, and plans are required.
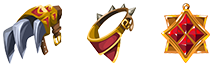
Level 1 Equipment

Level 2 Equipment
Troop Shop
Certain items to forge equipment can be found in the troop shop. To access the troop shop, you must go to the troop tab in the bottom menu, and then select the troop tab all the way to the right at the top.


Plans
The other item you need to forge equipment is plans for that particular piece of equipment. Those must be purchased in the troop shop with stones. Level 1 equipment plans cost 500 stones and level 2 equipment plans cost 10000 stones. Your troop must be a certain level before having level 2 equipment in the troop shop. There is only 1 type of plan in the shop at a time for each level(if both levels are available). Current plans in the shop are either attack, health, and recovery equipment plans. If the plan you are not looking for is in the shop, be sure to refresh it every 24 hours.
Level 1 Plans

Level 2 Plans

Portable Anvils

Portable anvils for forging level 2 equipment can be purchased in the troop shop with loyalty points.
Digs and Loyalty Points


With the exception of plans and hammers, all other items in the troop shop are purchased with loyalty points. The main way to obtain loyalty points is by sending monsters on missions at the dig site. In addition to loyalty points, your troop will also earn troop XP. Simply visit the missions board and choose a monster to send on a mission. There are different levels of missions that require a certain rarity monster to go on the mission. A monster of the same rarity required for a mission has a 50% chance to complete it. If you send a monster 1 rarity higher on a mission, it has a 100% chance to complete the mission. For example, a rare would have a 50% chance to complete a rare mission, but a super would have a 100% chance to complete a rare mission.
Crafting Shards

To forge level 1 equipment, you need to have 5 crafting shards that have the chance to drop in the Turtle Falls and Spring Clearing zones.
Upgrade Shards

Upgrade shards are required to forge level 2 equipment and can be found in the Lost Temple zone.
Jewels
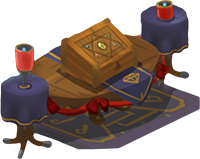
At the upgrade station, jewels can be upgraded and then socketed into equipment for an additional bonus. Jewels are initially obtained either in the troop shop and purchased with loyalty points or sometimes they are found while doing digs. There is also a jewel grab in the store with all of the other spins, located in the orange tab at the bottom and middle of the screen.


Upgrading

A jewel will grant more of a bonus to the stat for each level it has. Three jewels are needed to upgrade to the next level jewel. Without scrolls, the jewel has a 75% chance to successfully upgrade. If it breaks, then those 3 jewels are gone forever. Multiple jewels can be upgraded at the same time and without the proper number of scrolls, some may break and some may not. Scrolls can be purchased in the troop shop with loyalty points.

broken jewels
Upgrade Costs and Bonuses
| Jewel Level | Scroll Cost | Stone Cost | Stat Bonus | |
| 1 |

|
1% | ||
| 2 |

|
3 | 10 | 1.75% |
| 3 |

|
8 | 35 | 3% |
| 4 |

|
15 | 75 | 4.5% |
| 5 |

|
30 | 150 | 6.5% |
| 6 |

|
60 | 250 | 10% |
| 7 |

|
100 | 500 | 14% |
| 8 |

|
150 | 1000 | 20% |
Sockets
Level 1 equipment has 2 sockets and level 2 equipment has 3 sockets that can be unlocked for a jewel to be socketed into. You must unlock the sockets in the order that they are shown when viewing the equipment. The first socket to unlock always matches the type of stat that the particular piece of equipment is for. For example, an attack shiv's first socket will be for an attack jewel. The shape of a socket indicates what kind of jewel can be placed in that socket. The first socket in a piece of equipment costs 20 hammers to unlock, the second costs 50 hammers to unlock, and the third socket on level 2 equipment costs 100 hammers to unlock. Hammers can be purchased in the troop shop with stones.

The attack socket is square shaped, health socket is shaped like a shield, and the recovery socket is circle shaped. The following are examples of those sockets when they are locked:

Attack, health, and recovery sockets when unlocked:

Monster Rarity And Level
The number of weapon slots that can be equipped by a monster depends on rarity. A rare monster can only be equipped with attack equipment, a super can be equipped with both attack and health equipment, and ultra rarity monsters and up can be equipped with all 3 types of equipment. A monster must be level 15 to use equipment.
Repairing Equipment
Seeing your power rating drop is a good indication that your equipment is broken. You can double check if it is broken by viewing the equipment. At the forge station equipment can be repaired in the next tab over from the main forge tab. Each piece of equipment costs 100 stones to repair. Equipment can be repaired before it is fully broken and it takes 1 hour for the repair to complete. As mentioned in the beginning of this article, I recommend against repairing equipment if you are low on stones because it adds up, especially if you have equipment on multiple monsters.
Next